This is an old revision of the document!
Table of Contents
HO Train Controller
Introduction
This project demonistrates a Linux interface to a HO train set. We can control the engine direction and speed and the position of two track switches.
Overview
We wanted to use off the shelf components in order to build this system as quickly as possible. To this end we used slide switches for track switch control and engine direction. We use one slide pot on the quad slide pot card to control engine speed. The engine speed is controlled using a DC2 peripheral tied to a dual H-bridge card. Track switches are controlled using a quad open-drain driver.
 This page is organized as follows:
- Hardware and Wiring
- Peripherals
- Software
- Linux
- Python
- Next Steps
- DC filter
- DCC
- Low cost switch control

Hardware and Wiring

User interface hardware consists of a quad slide switch card and a quad slide potentiometer card. The leftmost two switches control the track switches. An on switch puts the track switch into the upward, or inner loop, position. The rightmost slide switch controls the engine direction with up being the forward direction. The rightmost slide pot controls the engine speed with up being as fast as possible. Even with a PWM frequency of 50 Hertz the slide pot must be almost 30 percent up before the engine moves. The direction slide switch is ignored unless the speed of the engine is set to zero.

Engine and track switch control use a dual H-bridge card and a quad open-drain driver card. The dual DC motor controller peripheral (DC2) and the dual H-bridge card (D7HB) can easily control the engine speed and direction. We set the PWM frequency to 50 Hertz to give better low speed control of the engine. A better solution to low speed control might be the LC filter described in the Next-Steps section below.
The track switches are left and right hand three-wire switches from Atlas. These switches have a common wire and two coil wires. Energizing a coil causes the switch to change position. These coils must be energized only long enough to switch. They will overheat and be damaged if the coils remain energized for an extended time. Switching only takes 100 ms or so. Since we are using using open-drain drivers we have to tie the common line to a positive voltage.
One problem with our chosen hardware is that at power up the open-drain driver outputs are at ground. This is a problem since the switch coils could overheat if the system does not come up fast enough. Recall that one of our goals was to build this system quickly and we did not want to add more hardware to the system. We found a simple solution using the available hardware. The engine control only uses one H-bridge, and the power up state of the H-bridge is ground. Since the H-bridge can handle seven amps we connected the common (positive voltage) of the track switches to one output of the second H-bridge. We turn the H-bridge on after system boot and so do not risk overheating the switch coils.
There might be a long term problem with our use of DC to control the switches. It might be possible to magnetize the plunger in the switches by repeatedly applying a DC current. A better long term solution would apply an AC signal to activate the coils. This is addressed in the Next-Steps section.
A 5 volt regulator card supplies power to the Linux single board computer. Our system uses a bench power supply set to 12 volts. This voltage gives a top speed of the engine that is low enough to not cause the engine to derail.
A wireviz generated wiring diagram for the system is shown below.

Peripherals
The four daughter cards in the system are the D7HB dual H-bridge, the DRV4 quad open-drain driver, the SW4 quad slide switch, and the SLIDE4 quad slide pot. The Linux (and FPGA) drivers for these are the DC2 dual DC motor controller, the OUT4 quad binary output, the IN4 quad binary input, and the SLIDE4 quad slide pot input.
We used the Demand Peripherals support page “Build your FPGA Image” to request the four peripherals we needed. Unused peripheral slots were set to GPIO4. Our FPGA image has the following slot assignments:
| Slot | Name | Description |
| 0 | enumerator | FPGA Interface and ROM contents |
| 1 | bb4io | The buttons and LEDs on the Baseboard |
| 2 | in4 | Quad input port |
| 3 | slide4 | Quad slide potentiometer |
| 4 | dc2 | Dual DC motor controller |
| 5 | out4 | Four binary output pins |
| 6 | gpio4 | Quad General Purpose Input/Output |
| 7 | gpio4 | Quad General Purpose Input/Output |
| 8 | gpio4 | Quad General Purpose Input/Output |
| 9 | gpio4 | Quad General Purpose Input/Output |
| 10 | gpio4 | Quad General Purpose Input/Output |
Channel 0 of the dual H-bridge controls the engine. We want the engine to stop quickly if our Python program exits for any reason so we set the DC2 watchdog timer to 300 milliseconds. Once the program starts we can enable the switches by taking the channel 1 H-bridge out of brake and into reverse (which sets output B2 high). The program start-up commands are:
dpset dc2 watchdog 300
dpset dc2 pwm_frequency 50
dpset dc2 mode1 reverse
We can be sure that all of the track switch coils are off by setting the outputs of the DRV4 card high.
dpset out4 outval f
Test one switch with the commands:
dpset out4 outval e ; sleep 0.1 ;dpset out4 outval f
Once the program starts we can read the state of the switches and the position of the slide pots using dpget commands.
dpget in4 inputs
dpget slide4 positions
Our program uses blocking reads so we do not use the interrupt-on-change feature of the IN4 or the SLIDE4.
Software
Linux
 About any Linux based single board computer will work. We used a surplus OrangePi PC loaded with Armbian. We installed dpdaemon following the directions in the Downloads section of the Support page.
cd /tmp
git clone https://github.com/DemandPeripherals/dpdaemon.git
cd dpdaemon
make
sudo make install
We put the FPGA image in the /root directory and start dpdaemon and the Python control program from rc.local with the commands:
/usr/local/bin/dpdaemon -l /root/DPCore.bin
screen -dm -S traincontrol /usr/bin/python3 /root/traincontrol.py
Python
The Python program reads the slide switches and the slide pots to determine the position of the track switches and the speed and direction of the engine. We need regular updates to the DC2 peripheral to keep the engine running. We use the fairly simple approach of polling for the switch and pot positions. At the end of the poll we update DC2 and start the next polling loop.
The track control switches are edge sensitive. That is, we want to energize the track switch coils only when the slide switch position changes and then only briefly. At program start time the position of the track switches is unknown so we set the stored values such that the first pass through the polling loop will always set the track switches.
At program start time we want to force the speed of the engine to be zero until the slide pot is actually set to zero, at which time the pot can start to control the engine speed.
Next Steps
DC Filter
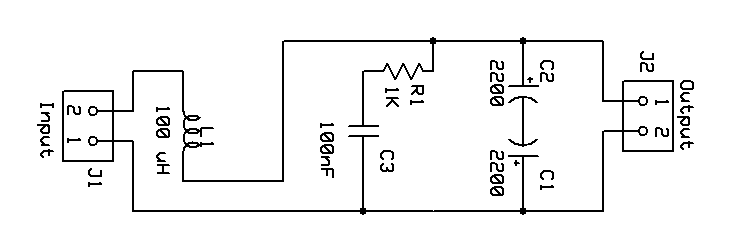 While lowering the PWM frequency to 50 Hertz can help with low speed engine control it still leaves a large dead band for speeds below about 30% PWM. An LC filter can smooth out the PWM pulses giving an almost pure DC voltage. The LC filter shown is described on this page:
http://www.trainelectronics.com/ART5700TrainEngineerRevolution/PWC--Linear_CRE57091/index.htm
While lowering the PWM frequency to 50 Hertz can help with low speed engine control it still leaves a large dead band for speeds below about 30% PWM. An LC filter can smooth out the PWM pulses giving an almost pure DC voltage. The LC filter shown is described on this page:
http://www.trainelectronics.com/ART5700TrainEngineerRevolution/PWC--Linear_CRE57091/index.htm
At 20KHz the DC2 peripheral has 10 bits of PWM resolution. At 80 KHz it has 8 bits of resolution. If you use an LC filter like this you may want to change the pwm_frequency resource to 80 KHz to get a smoother DC output.
DCC
Model train Digital Command and Control (DCC) is well explained at the DCC Wikipedia article:
https://en.wikipedia.org/wiki/Digital_Command_Control
The system described in the this article is well positioned to move to DCC. Right now there are two peripherals that use the D7HB dual H-bridge, the DC2 dual DC motor controller, and the STEPB bipolar stepper motor controller. With a little Verilog it should be relatively easy to add a third peripheral that uses the D7HB. Let's call it DCC2 for a dual DCC interface. One advantage of an FPGA in this situation is that you can go from older DC control to DCC with just a software change – you do not need to change any wiring to make the track DCC controlled.
Low Cost Track Switch Control
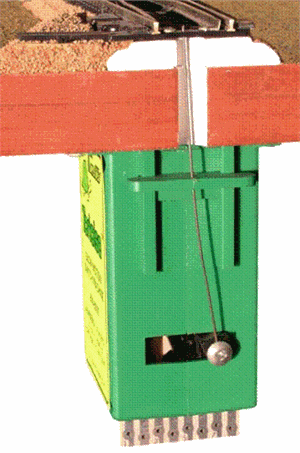 Larger layouts tend to use servo motors mounted under the train table to control track switches. The Tortoise Slow Motion Switch Machine is a popular example. This picture from tophobbytrains.com shows how the servo movement switches the track. The servo operates with two 12 volt wires in a type of H-bridge arrangement. With the two wire at (+12, 0) the switch is in one position and with the wires at (0, +12) it is in the other position. The stall current is only 15 or so milliamps. The D7BH and DC2 could control two switches but might be overkill for such low currents. We are considering how to solve this problem now. Please let us know if you have any ideas for a low cost, low current H-bridge.
